
What is File History
File History is a useful feature provided by the latest versions of Windows to perform a sort of incremental backup of our files.
It performs, according to a schedule, a backup of new files, but without deleting old versions of them from the backup.
In this way, in case of problems with the new version you will have a ‘history’ of its old versions.

Note that this function is very useful in all those contexts where you need to periodically edit files, not for storage, because there are much more complete solutions for archive backups.
It is very useful for example for those who work with text files: let’s imagine making a modification in a file and for distraction you delete something important. Normally the old version would be irrecoverable, but if you have set file history, you will have all the old versions ready to be restored.
It is also integrated with the operating system, and restoring a file is very easy.
How to activate it
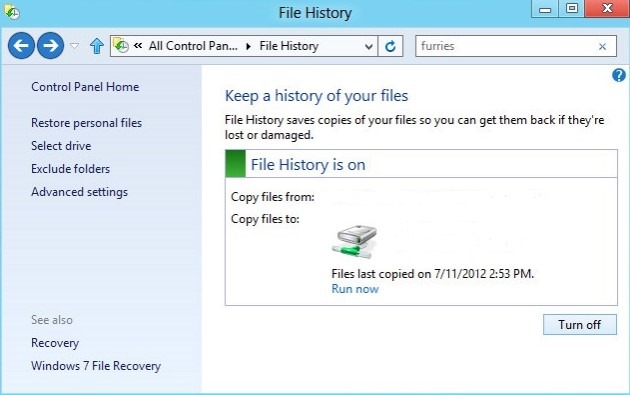
Open the control panel and search for ‘File History’.
From this window you can set a destination Hard Disk for backups, and on advanced, how often to schedule the automatic backup.
You can also exclude folders from automatic backup.
To enable the file history, just choose a destination drive.
However, one problem arises here: as shown in the picture, the system will only back up the “collections, desktops, contacts, favorites, OneDrive” folders.
How do you specify as backup source of other folders, maybe on different drives?
Microsoft in this case unfortunately does not provide with a convenient interface to choose other sources, however it is possible to bypass the problem in this way: file history is going to ‘pull’ files from the real collections?
Well, then let’s put all the folders of interest in the collections.
Actually, when you mark a folder ‘like in a collection’, you are including only one link, not all files, don’t worry, you don’t have to move anything.
Go to the folder you are interested in including in the backup and right-click it, then go to ‘Include in the collection’.
You can decide to add it to an existing collection, or if you want to be precise, create a new collection (maybe called file history) just for all additional backups.
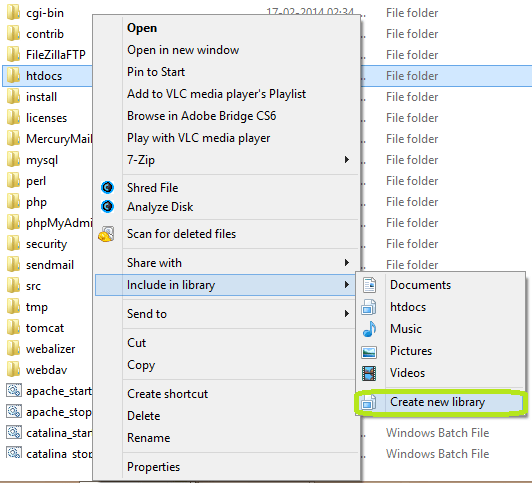
In this way, at the next schedule, the backup will also be made of customized folders.
How to restore a file
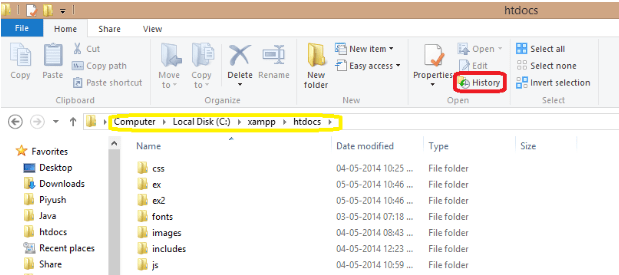
If you need to recover a file, you can restore it either from the control panel (always going to file history) or directly from the folder where it was present.
To make things clear, if you have included in the collection the X folder that contains the Y folder, which contains the Z file
X (folder)
| Y (folder)
| Z (file)
| ...(other files)
and you want to restore the Z file, go to the Y folder (where the file resides or was residing) and go to the “File History” button at the top:
A new windows will open containing ALL the previous revisions of the files.
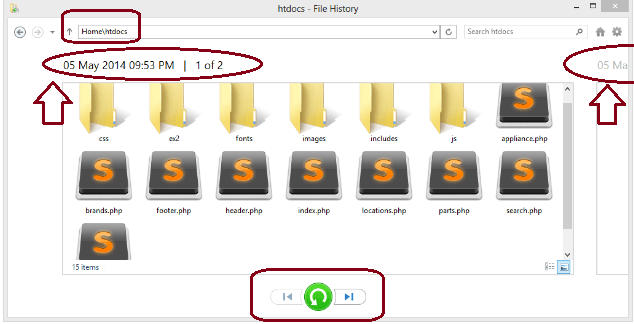
You will be able to navigate BACK IN TIME and restore an old version from even months ago, maybe just the one you lost!
You can indicate from the file history settings how much you need to keep in backup archive the files.
Note that the file history is not designed for large file archives, but for all those situations where there is frequent modification of small/medium files.
For backup of entire HDDs or files ‘from archive’, you should use the ‘Windows 8 Backup’ feature, or 3rd party softwares.