
DNS stands for Domain Name System, it is the protocol used globally for domain name translations.
 What does it mean?
When we type in the name of a website (e.g. spaceclick.com) our computer sends a DNS request to an appropriate server to translate this name into an IP address (e.g. 105.0.0.155). And then it connects to that IP address to download and view the site.
This is because each server (which contains a website) is present on the Internet with its own unique (numeric) IP address; computers certainly do not know how to implicitly route a ‘verbal’ request to a ‘numeric’ address!
Hence the need for translation.
There are many DNS servers around the globe, waiting for a translation request.
As a rule, each provider that provides Internet connection (especially for private individuals), pre-configures its routers to connect to the company’s own DNS servers. This is because in case of need the company itself can prevent the translation of certain sites, perhaps after a block requested by the authorities (malicious sites); in this case the site will not be reachable from the requesting computer (but by actually knowing its IP address, we could very well connect!).
Why should you change the DNS?
It is often the case that the DNS servers of local providers resolve requests with poor performance, especially during peak hours in high loading conditions.
Routing DNS requests to a 'fast' server will speed up our navigation accordingly!
The following scenario could also happen: a site is not reachable due to a lack of propagation of new DNS parameters (it happens especially when a foreign site modifies something, and days pass before these changes arrive on the servers of Italian providers).
Finally, there may be a need to overcome blocks imposed by the provider and therefore resolve as many names as possible.
The alternatives
As written, there are not only the provider’s servers!
Scattered around the globe there are thousands of equivalent servers, some more and some less ‘open’, some more and some less secure and fast.
Here are some recommended ones:
DNS Google
8.8.8.8
8.8.4.4
DNS CloudFlare
1.1.1.1
1.0.0.1
DNS OpenDNS
208.67.222.222
208.67.220.220
DNS Comodo SecureDNS
8.26.56.26
8.20.247.20
DNS Dyn’s Internet Guide
216.146.35.35
216.146.36.36
DNS FoolDNS
87.118.111.215
213.187.11.62
DNS Vodafone EU
91.80.35.134
91.80.35.166
Which one to choose?
Needless to say, for speed and reliability, the best are CloudFlare and Google, which are also known for the immense extension of their cache databases (they resolve many more domains than the rivals in a very short time). However, if we are looking for more security the best choice will be OpenDNS or SecureDNS, where we are given preventive protection against pishing attempts or sites containing malware and viruses.
These DNS servers block such sites, thanks to a list updated by network users themselves.
How to change the DNS parameters
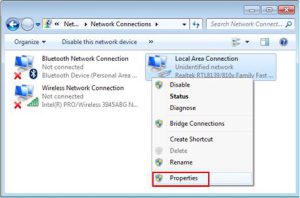
1. Go to ‘Control Panel’, Open ‘Network and Sharing Centre’ and Go to ‘Tab settings’ – Or to do the same open the tool ‘Run’ (Win+R) and type:
ncpa.cpl
Select the network card with which the computer connects to the router and then to the internet (usually it’s an ethernet on landlines and a wireless one on laptops).
Go to properties.
Note for advanced users: if VirtualBox/VisualStudio or other programs that use virtual network emulators are installed on your computer, there may be more choices in the ‘tab settings’ window. You need to find the ‘upstream’ network card and modify only that one, because if you modify a card of such emulators, not only will it cause the virtual bridges to malfunction, but you will not have modified the DNS to the real network card in your PC!
2. Scroll down the list and select the ‘TCP/IPv4 Protocol’ line (be careful not to uncheck the box on the left), and go to Properties.
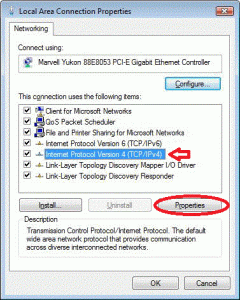
The new window that appears, might have 2 cases:
-the ‘Get DNS server address automatically’ box is checked, in which case proceed to put one manually.
-the ‘Use the following DNS servers’ box is already checked. This means that the computer had already been previously configured for a specific DNS server, in which case we advise against modifying it, or we suggest that you mark the addresses found so that you can restore them in case of problems.
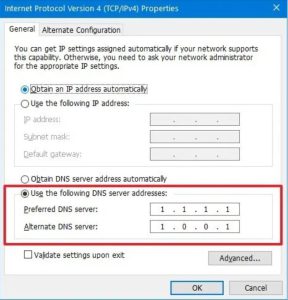
Proceed with the manual entry (in our case we have chosen Cloudflare):
WE ARE NOW READY TO CHECK THE NEW SETTINGS
Among the various ways to test the new dns, there is the quick command prompt mode.
Open the Windows prompt (start>run>cmd or search cmd from the Windows 8 search), type
nslookup
and click on send
The following reply with the deputy server will appear right below. If the address matches the one we chose, the setting is successful.

From cmd I also suggest to launch the following command:
ipconfig /flushdns
to clean up the DNS cache managed and stored locally by Windows.
Now we can also try to manually resolve some names, such as spaceclick.com with the following command:
nslookup spaceclick.com
the answer will contain the IP translation (and therefore its real address in the network) of the domain of this site.
F-SECURE for confirmation…
An alternative method to check the correct DNS settings (on Router or PC) is provided by F-Secure.
Through the Router-Checker service (which can be reached here) the site carries out a verification of the IP addresses we request and notifies us of any ‘hijacking’ of which we are not aware.
To see the details, open the page, start the test and finally go to Details of your DNS server’s IP address.
This is very interesting because it protect us from DNS hijacking attacks (which in short, make us believe we are opening a site legitimately instead of connecting to a site made ad-hoc by an attacker to take personal data from us).
When browsing from your regular browser, you will certainly notice an improvement in performance,
especially when you click on the links to move from one page to another.
It is always possible to go back to the previous settings (i.e. using the provider’s DNS) by putting the option back to ‘Get DNS server address automatically’.