
In order to be able to observe the night-time cosmos we have to use special precision instruments, such as telescopes, eyepieces frames and cameras … You will find an introduction to the world of astrophile and amateur astrophotography in this article
Telescopes
The telescope is an optical instrument with which we are able to observe the Universe, capturing as much light as possible while concentrating on a surface of about one inch (the eyepiece).
In particular, we can observe the planets of the Solar System, constellations and stars. A telescope usually consists of a metal tube and two lenses: the eyepiece and the objective. The lens is a converging lens with generally a long focal length; it forms a real image in the focus that is reflected back by the eyepiece.
The eyepiece enlarges the image and we can see a new image, which is virtual and enlarged. Our eye is positioned near the second focus of the eyepiece.
We can divide telescopes into three species: telescopes with lenses, those with mirrors and mixed telescopes, i.e. using both lenses and mirrors.
REFRACTORS
The optical component of a refracting telescope consists of a long tube on the front end to which there is a doublet (two optical glasses, or lenses, suitably spaced in air) called an objective, the function of which is to collect and focus light. The objective substantially performs the function of a prism: it decomposes and recomposes the light radiation at a given point given by the instrumental focal length.
The optical tube, besides performing the function of supporting the objective and the ocular (or the device that examines the light radiation) avoids the degradation of the image due to internal air movements, since it is closed on both sides.
The eyepiece is another set of lenses that serves to make all the details contained in the image formed by the lens accessible to the eye.
Refractors can be achromatic, semi-apochromatic or apochromatic depending on the ability to focus light of different colours in the same spot.
A refractor is also suitable for beautiful terrestrial views, but it must have characteristics of a certain quality.

REFLECTORS
The most used is the Newtonian (it has a Newton type configuration) with a lens that is no longer a lens but a mirror and it is placed at the bottom of the optical tube. It also has a second mirror that diverts the beam of light towards the eyepiece at 90°.
An example is the well-known, classic Newton 114mm. size which corresponds to the diameter of the same mirror:

Newton reflector with altazimuth support for non-motorised floor.
The light from the star enters from the left, passes through the optical tube and is reflected by the mirror lens (Primary mirror) and conveyed towards a second mirror (Flat secondary) which reflects it towards one side of the tube and sends it towards the eyepiece, a group of lenses placed in an aluminium or steel barrel which makes the image clearly visible and enlarged.Telescopes of this type are simpler structurally and therefore cheaper.
Quality observations can be made when combined with a good frame.
However, they can also be found on sale in some “markets” under the house or in stock with prices around 30, 50, 70, 100, 150 euros. They are considered as the first tools used by some beginners, or for children. They are obviously not recommended for use beyond fun and games.
HYBRIDIS
A type of “hybrid” telescope is the Schmidt-Cassegrain: It is a very lucky optical pattern, “reinvented” by American manufacturers about thirty years ago and sold massively, especially in the 8″ (20 cm) version.
Their fortune depends in particular on their compactness, but the advertisements highlight the various advantages of the closed tube.

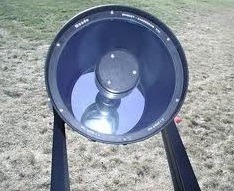
There is a shaped slab at the front. Its function is to compensate for the spherical aberration introduced by the two mirrors. It is also used to support the secondary mirror. This, which is quite large, is responsible for a filling factor that slightly affects the engraving of the image. Note that the primary mirror is pierced in the centre to allow the light beam to pass through to the rear eyepiece.
The correction plate usually has a multi-layer anti-reflection treatment (such as the celestron StarBright XLT) which, due to its softness, it is recommended not to clean too frequently. The ease of collimation of the optics is particularly appreciated in this type of telescope.
The main advantage of a “closed tube” is that the reflective surfaces are sheltered, so they neither get dirty nor lose their reflectivity, which unfortunately happens to telescopes with open tubes. A closed tube is also less susceptible to internal turbulence, although it needs more time to reach thermal equilibrium.
A disadvantage is the ease with which humidity settles on the slab, a real annoyance that makes it necessary to use a good lens hood, and sometimes even the repeated action of a hairdryer.
THE PEC
Periodic Error Correction, or PEC, is a stunt by some telescope manufacturers that has the function of reducing the periodic error of the worm screw (due to irregularities in the shape of the worm screw), which causes most of the clockwise motion tracking errors.
The PEC consists of a circuit programmed to store the corrections given by the photographer during a “driving test” and then re-execute them for the duration of the photographic session. The idea is quite good and it allows to increase the driving precision and relieve the stress of the photographer, who with the PEC in operation must intervene less often in the corrections.
THE BRAND

For the less experienced it is undoubtedly an arduous choice… that of the brand.
There are many good brands for telescopes, based on the consideration of various parameters.
For example, Meade is ranked as the most popular in the world, Celestron is ranked as the company with the best optics in the world and SkyWatcher remains afloat because of the cheapness of its instruments.
Depending on the price, the performance of the telescope (in terms of weight, frame, but above all the aperture) and the use you want to make of it, you have to proceed with the purchase “hoping” that it will give us great satisfaction and very few problems.
The frames
There are 2 types of frames: Altazimuth and Equatorial.
ALTAZIMUTH SUPPORTS
This allows movement in two directions: parallel to the ground, i.e. in azimuth (horizontally), and at right angles to the ground, i.e. in height (vertically).
Height is the vertical angular of an object, expressed in degrees, with respect to the plane of the horizon.
Azimuth is the distance of a celestial object from the North of the observer’s horizon. It is measured in degrees, starting from North (which has a value of 0°) in a clockwise direction.
It is particularly suitable for terrestrial observations, because of the natural way in which it is used.

The altazimuth support is more comfortable to use but causes a number of problems, such as field rotation (when making long poses) or tracking accuracy.
EQUATORIAL SUPPORTS
The most common is that of the “German style” type with the first axis of rotation inclined in relation to the supporting surface (the tripod) which must be adjusted with a precise angle in relation to the horizontal plane, or to the ground plane, around 42° (corresponding to the latitude in our parts to the south-east of Bari) and oriented, with a certain precision to the north, towards the North Star.

Only in this way, by properly positioning the telescope according to these and other precise instructions, with a single simple manual or motorised movement, you can easily follow, the sky and the stars, the Moon and the planets, keeping the object in the framed field even at high magnifications.
It should be noted that these rotation supports (Altazimuth but also Equatorial) in the basic instruments, and inexpensive, do not have good precision adjustments and are shaky.
Even with the telescope equipped with equatorial movement (strongly recommended by us), the tracking of the celestial object, at high magnifications, can become a problem in simpler systems.
But in most cases, in relation to the purchase of a first telescope, the equatorial mount also “entry level” (EQ1 = equatorial class 1) is fine.
But I suggest, with clarity, to start at least with the equatorial support called EQ2, which is more stable and perfectly motorised, it is mounted, for example, in the Skywatcher 130 S Motor Telescope imported from Auriga S.p.a.
The EQ2 mount, at a slightly higher cost than the EQ1, is more precise, smoother in movement and can also be electronically controlled.
Astronomical sensors
CCD & CMOS – MONOCHROME & COLOURS
There are 2 types of digital sensor: CCD and CMOS.
They can be Monochrome or Colour.
The range of cameras and CCD or CMOS cameras in the entry-level category but with higher functionality than common webcams is constantly growing, and there is a continuous proliferation of offers also in the specialised field of CCD self-guides and cooled CCD cameras.
But the most important thing is that, at last, the growth in the performance of these cameras is accompanied by a drastic reduction in purchase prices, probably caused by the weakness of the US dollar against the euro.
This means that those who devote themselves to digital filming of celestial bodies now have an increasingly wide range of models available, and can more easily find an affordable camera.
CCD SENSORS
The CCD is a circuit composed of many light-sensitive points. Each single point gives a value according to the intensity of the light hitting it.

The sensitivity of the CCD in low light conditions, such as in astronomy, is conditioned by a kind of background noise that compromises part of the performance near the minimum visibility limits.
In practical terms, images of poorly illuminated objects will be “dirtied” because of a shaky background of variable tones which is very annoying for the processing of the images themselves. This disturbance often prevents the correct perception of the image and sometimes compromises its success despite processing.
This background noise is a constant common to all CCDs and it is generated spontaneously due to the nature of the materials and the electronic use of the CCD itself, which responds to all traditional chemical and physical phenomena by generating “parasite” values (currents, voltages, capacities, etc.) common to many components and circuits.
Although these values are predicted and limited, the only way to eliminate them completely (and obtain precise images without disturbance) is to bring the CCD to very low temperatures. The lower the temperature of the CCD, the lower the noise value will be.

Cooling an electronic component is not a very simple operation and while winter observations can give us a hand (not for the sky but for the temperature!), the milder and more visible months are a problem for very sensitive CCDs.
High level CCDs for astronomical use are always equipped with a special cooling circuit, consisting of a special electronic component that once powered generates on its two surfaces a very hot and a very cold side (in proportion to the current supplied and the characteristics of the same component).
The cold side is put in contact with the CCD while the hot side is placed on the outside of the container, in direct contact with heat sinks, often ventilated. This method has the advantage of providing good constant cooling to the CCD at low temperatures but also has the disadvantage of having to be powered and absorb a lot of current.

CCD sensors are much more sensitive than CMOS sensors, because they are mainly monochrome (unless you use 3 CCDs, one for Red, one for Green, and one for Blue), they can capture more light in a given period of time (especially IR – see image above). CCDs like the one above, with RGB (red-green-blue) pixels all in one chip, have lower resolutions than monochrome ones.
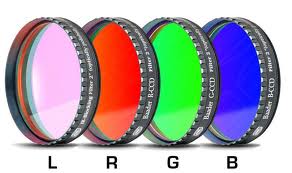
To take coloured photographs with monochrome CCD sensors, you need to take 3 shots (1 in R, 1 in G, 1 in B) with special filters available on the market, and sum them up with the help of a photo editing software (such as photoshop). For those who are experts, the luminance channel is also considered.
CMOS SENSORS
CMOS sensors, which are cheaper with the same resolution when compared to CCDs, and certainly more comfortable for the less experienced because COLOURS, are recommended for those interested in “fast” or shallow astrophotography.
They are mostly not recommended compared to CCDs for self-guiding because they are much less sensitive to visible light but also IR than seconds. There are, however, some acceptable compromises, given the progressive miniaturisation of some models (for example, having the eyepiece-sized self-guiding cameras is a great advantage when used on an off-axis guide or on a small guide refractor mounted above the main tube).
The most common uses of mid-range CMOS sensors are for photos of planets. With just a few shots it is possible to achieve remarkable goals, without the need for multiple shots with the various filters (to get the colour).
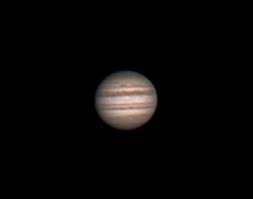
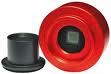
For example, to obtain this result (with a suitable telescope), it is possible to find several models on the market;
starting with the cheapest ones such as Magzero entry-level:
Alsofor them, due to a higher background noise than CCDs, a good cooling source is recommended, to reduce the motion of “parasite” electrons.
An inexpensive alternative to professional CCDs or CMOS are DSLRs (which are CMOS) or Webcams (also CMOS but mostly used in the past).
DSLRS
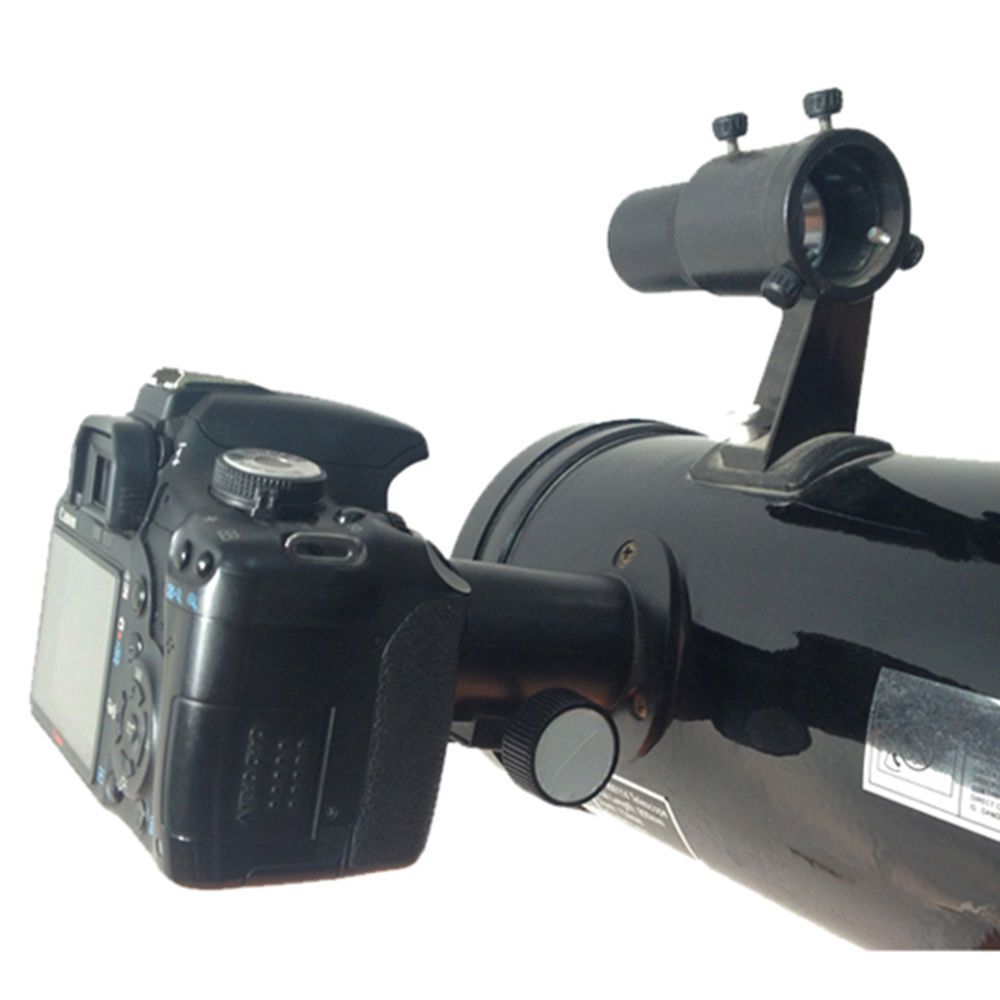
The recent technological leap forward in CMOS sensors has made the production processes of commercial ‘Reflex’ cameras more and more refined and reliable, both affordable and even convenient, favouring this type of purchase over a professional, cooled chamber.
Of course, having a sensor cooling system is also useful with these models, but it is possible to achieve good astrophotographic results even without it. The trick here is to prefer mini poses with long exposures.
If it’s true that with cooled CCDs and equatorial mounts it’s possible to leave the shutter open for more than hours, with a DSLR it’s possible to perform mini exposures of 1 or 2 seconds each in the same period of time, and go to compose the final image with the help of software.
With this technique, you can go to ‘add’ in post production, all the various shots of the evening, obtaining many times comparable results (if we are talking about sufficiently bright objects, such as Messier), to the sensors of enormously higher costs.
THE WEBCAM
Due to my passion for technology, I witnessed the first very encouraging images obtained with these digital cameras designed for video-chat, and after discovering that their cost was extremely low, I decided to buy one (in particular the Philips Vesta) to try the acquisition with the planetarium.
The shooting and processing demonstration with IRIS immediately convinced me that this was an interesting approach. The key to the quality of this technology for high-resolution planetary imaging is the ability to record digital footage consisting of hundreds or even thousands of frames in just a few minutes: this allows you to “beat” the negative effects of planetary footage in a single shot, i.e. atmospheric turbulence (within certain limits) and electronic noise. In fact, a continuous film records both the moments when the image of the planet (or of the Moon or Sun) is often deformed by “gusts” of atmospheric turbulence. However, since the film is continuous, images not disturbed (or not disturbed) by the seeing are also recorded on various frames.
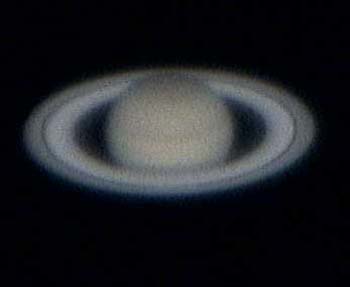
Actually, if you carefully examine a single frame selected among the best of a movie of a planet shot during a (rare) night with the motionless atmosphere, taken with a Philips Toucam webcam, you immediately notice that this frame is very grainy and poor in nuance.
At this point comes into play the very powerful technique of selecting, registering and summing the frames, operated by one of the many software (I used Registax 4, but it is also possible to use the IRIS counterpart) created for this purpose, and obtains the miracle of decisively reducing noise, greatly increasing the dynamics or tonal nuances of the images, enhancing details and colours at the expense of artifacts (generated by the webcam drivers).
Plus points:
Comfortable focusing
The software for editing movies or sequences is free and very powerful
Very low cost
Fast interface (but it is actually USB 1.1, not 2.0)
Negative points:
Very high electronic noise
Very dirty blue channel

Not exuberant sensitivity (with Saturn and remote planets the focal ratio f/25 cannot be exceeded).
The resolution (640×480) is suitable for images of planets,
low for images of the Sun and Moon Small sensor Very disappointing A/D resolution: only 4 bits per colour channel + 8 bits of luminance.

The single frames of a movie are of low quality due to the fact that the USB 1.1
bandwidth is not wide enough to support a video stream as wide as that
of a VGA resolution camera, and therefore the camera drivers operate a "on-the-fly"
compression of the movie (which is irreversible - lossy - i.e.
causes a quality degradation that cannot be recovered afterwards)
which aims to pass the huge data stream in the narrow available bandwidth.
 |
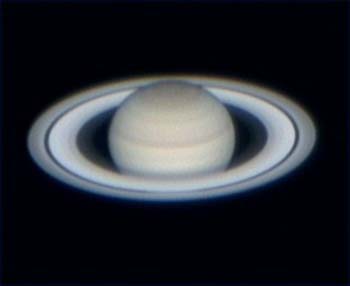 |
| One of the best “single” frames of a shot of Saturn, taken on 26/12/2003 with Philips Toucam Pro I + IR-Cut filter + Barlow Baader FFC 3x + Celestron C11 + Astro-Physics 900 GTO frame. Seeing 8/10. | The 700-frame film of the same shot, after processing with the free Registax 4 program. You immediately notice the enormous increase in detail and nuance. |
THE FOCUS – THE BAHTINOV MASK
When using CCD detectors to take night shots, it is sometimes very difficult and nerve-wracking to focus (for the more precise “perfectly”) on the image, this is because the eyepiece is usually “occupied” by the same detector.Using a Bahtinov mask, you can focus with almost perfect precision, in a short time.

Once you have centred a fairly bright star, simply place it in front of the telescope opening and take small control shots.
If the image is in focus, we will have a result like the following:

we will now be able to move the telescope to other stars, without having to touch the focus slider anymore, because the distance considered is always infinite. And perfect focus is “guaranteed”!